

On this page
Review project setup
Use Project Overview, Readiness, the input list, and Files, Folder, and ZIP controls to review the material available for analysis.
Open a project and select Setup to check its source platform, current input inventory, and the next step offered by the product. Compare this information with the package and scope agreed with the source owner.
You need access to an existing project. Reading its inputs does not require uploading new files or rerunning the analysis. Editing actions depend on your permissions.
Project Overview
The top panel identifies the project, Source Platform, creation date, and last activity. Last activity currently reflects time since project creation. Do not use it as proof of source or analysis freshness; check the supplied revision and analysis state. Confirm the project and platform before inspecting or changing inputs. A Qlik script, a DataStage export, and a COBOL program require their corresponding project platform.
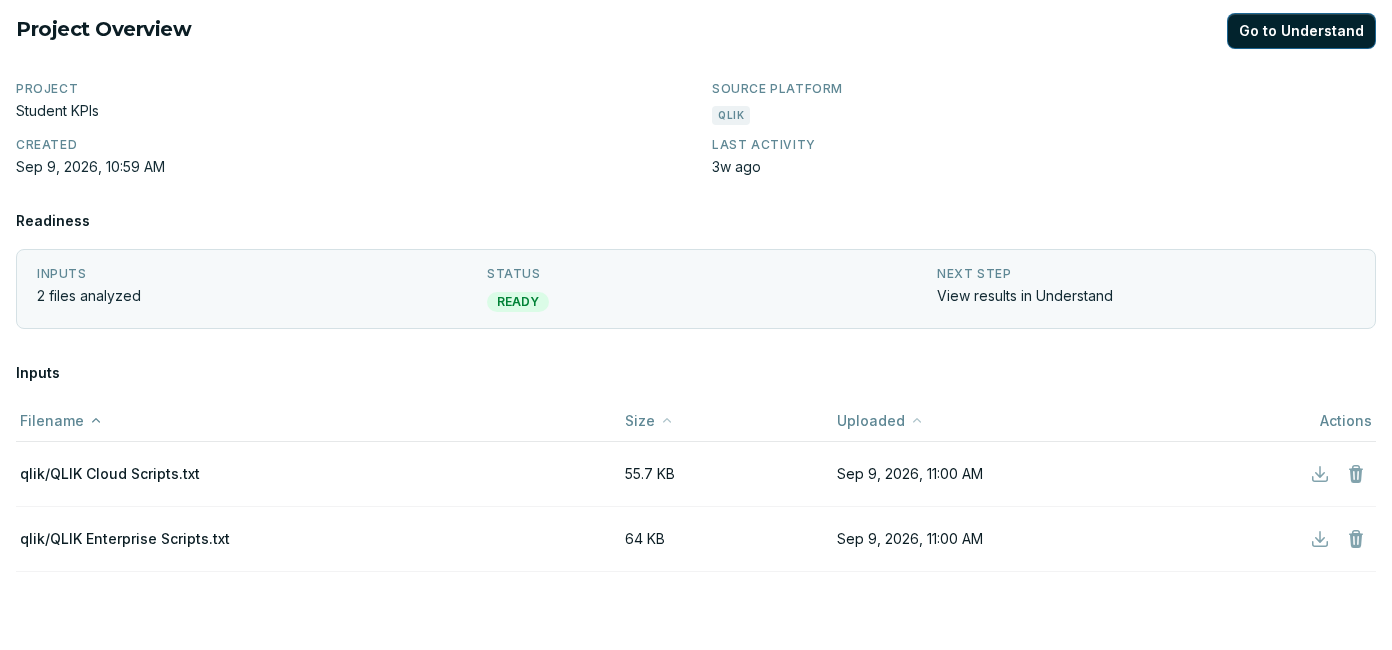
Open the Understand tab to inspect available results. The Go to Understand button in Setup can require editor permissions. Check the intended inputs and readiness message before treating the result as the current source revision.
Readiness
Read the three columns together:
| Widget | What it tells you | What to do |
|---|---|---|
| Inputs | The input progress or count reported for this project | Compare it with the expected package |
| Status | The Setup readiness state | Read it alongside the current input and analysis context |
| Next step | The action suggested by the product | Follow it or resolve the reported preparation issue |
In the screenshot, the panel reports 2 files analyzed, READY, and View results in Understand. These describe the observed project. Check the messages and results in Understand to establish whether the analysis answers your question and represents the inputs you intend to assess.
Complete a pending setup step
If Readiness shows Sharding setup pending, an editor must choose Review sharding setup before starting Understand. The Sharding graph card opens the configuration used to group the analysis. Review the proposed settings and choose Save and continue, or retain the defaults with Skip (use defaults). Completing this step releases the setup hold; it does not mean analysis has finished. The configuration is locked after Understand starts. On an existing analyzed project, an editor can use the card to view its setup.
Inputs table
Use Filename, Size, and Uploaded to reconcile the project with your input manifest. The table shows at most 1,000 inputs, and sorting applies to that loaded list; Readiness can report a larger total. For larger packages, reconcile each upload result and retain the full handover manifest rather than treating the visible rows as a complete inventory. Paths help distinguish files with the same basename from different source folders.
- Locate each expected artifact or package component.
- Compare its path and upload date with the handover record.
- Investigate missing, unexpected, or older files with the project editor.
- Download requires editor permissions and retrieves the stored text content.
For a workbook, that is converted text, not the original
.xlsxbinary. Retain originals with the source owner for an exact artifact comparison.
The delete action changes the project inputs. Use it only when intentionally removing material from the assessment; it is not part of this read-only review. Avoid deleting inputs during analysis: deletion changes the input set and can trigger reprocessing. A change to inputs requires checking the resulting analysis state and scope.
Files, Folder, and ZIP
The upload area offers three ways to supply the prepared material:

| Control | Use it for | Check beforehand |
|---|---|---|
| Files | Selecting individual prepared artifacts | The files cover the intended source and dependencies |
| Folder | Supplying a collection organized in directories | Paths preserve package, program, or service context |
| ZIP | Supplying an archive of the prepared material | Its contents are appropriate for the source platform |
| Drag and drop | Adding files through the drop area | The same source-format and scope checks apply |
The transfer method does not determine how to extract the source. SAS or Qlik source can be collected as scripts; Informatica and DataStage use native exports; SAP BW uses a dedicated extraction program. Follow the platform guide before choosing files here.
Use Folder or ZIP when directory paths distinguish same-named files. An ordinary Files selection or loose-file drop does not preserve those paths and can collapse duplicate names. Do not mix a Folder selection with Files or loose-file drops in one batch: paths are retained only when every selected file has a relative path. This is especially important for SAP BW and webMethods packages.
Choose an upload batch
ZIP is available for all eight supported source platforms. Upload one ZIP at a time, as the only selected file. Do not mix archives and loose files in the same batch or rely on nested archives being unpacked. Keep package-relative paths inside the archive, particularly for webMethods services.
For SAS, Qlik, Informatica PowerCenter, and SAP BW, upload supporting .xlsx
workbooks separately through Files or Folder. Workbooks inside a ZIP are
skipped. These workbooks provide dictionary context alongside native source;
a project containing only workbooks has no source processing to analyze.
Check replacement and processing effects
A file uploaded under an existing name or relative path updates that project input. Confirm the intended replacement before uploading. Accepted uploads can start processing and enrichment; a pending setup step can hold that work until the editor confirms it. Upload success does not establish analysis success.
The upload result briefly shows counts of new, updated, and skipped files. It does not name skipped files or display their individual reasons. Record the counts while visible, then compare Inputs with the handover manifest to identify missing material, allowing for the 1,000-row list limit. Do not assume a zero skipped count proves completeness: hidden ZIP entries are omitted without increasing that count. Check the resulting state in Understand and keep the input revision with the assessment.
Handle size and archive limits
The default limits are 128 MiB per uploaded file and 150 MiB per upload request. The default multipart limit is 200 parts per request; file batches and any additional form fields must fit within it. The installation can configure different upload limits. Folder uses a file part and a path part per file, plus the project identifier: with the default limit, use at most 99 files per Folder batch, or a single ZIP preserving their paths. ZIP extraction also limits collection to 15,000 file entries and 500 MiB of extracted content; individual extracted files must fit the file-size limit. Hidden and unsupported entries can be omitted. Once the extracted-content limit is reached, remaining ZIP entries are not processed or individually listed.
If a limit or skipped entry affects your package, split it into smaller batches while preserving paths, or agree an appropriate upload size with the instance administrator. Verify each batch’s result rather than counting the archive itself as a fully accepted source.
Verify the setup review
You should be able to identify the source platform, account for the supplied files, and explain any difference from the intended package. Continue to Understand when its result is available for the scope under review. If the material is incomplete, resolve that specific gap with the source owner before closing the affected part of the assessment.